Showing posts with label Crafts. Show all posts

As much as I love my cereal box star wreath, now that July is coming to an end it is time for a new wreath. Some of you may already be looking to fall wreaths, but we have another two good months of summer left, so I made a summer wreath. I found this summer wreath on pinterest and it took me to Living, Loving, Crafting. I loved it right away and set out to make my own. The funny thing is that I didn't realize how similar they turned out until I went back today to make sure to get the right link for this blog post. Great minds think alike, and pick out the same paint and ribbon. I think that's how the full saying goes.

Anyway, here is what you need to make this great summer wreath.
18 inch grapevine wreath- Micheal's had the best price by far. I found mine for $5.
Flowers- I got 2 bunches from the dollar store
Numbers for your address- I got mine at Joanns for $2 a piece, but I think I could have found them cheaper elsewhere.
Ribbon
Spray Paint- I used Krylon Blue Ocean Breeze, leftover from my soda bottles project, $3.50 at Walmart.
Hot Glue

Step 1- Sand down the edges of the numbers and spray paint them. I made sure to really cover the front and sides with paint, but I didn't worry too much about the backs, except for the 3 which I didn't notice until I was about ready to glue had been sprayed backwards.


Step 2- I pulled all of the flowers off of their stems and hot glued them to the wreath. It would have been nice to have a few more flowers, but I didn't want to make another trip to the dollar store. The nice thing was that even once they were glued on it was still pretty easy for me to pop them back off to rearrange them.


Step 3- I glued my numbers on and tied a simple bow on to top it all off.


Overall a very simple wreath. I love the bright colors. It just makes our front door look so happy and inviting.


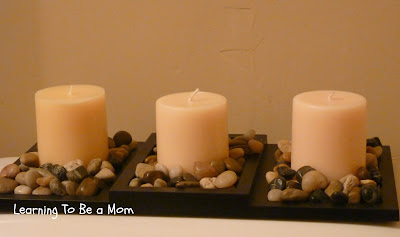
I have been very unhappy with our guest bathroom since we moved in. I just couldn't seem to find anything I liked to put in there. When we went to visit my sister-in-law inspiration struck. She had a cute toilet topper decoration with candles and  decorative rocks, so we replicated it for our bathroom.

Here is what I used.
Picture frame from Walmart-$3
Decorative rocks from the dollar store. I bought two bags, but only ended up using one.
Three candles from the dollar store.
Grand Total=$7


This was really easy to put together. I just set the candles in the middle of each of the rectangles of the frame and then poured the rocks in around the candles to fill in the frame.

I really liked the way this turned out. It was so simple, and it goes with the paintings I got from TJ Maxx. Hopefully I can show off a few more bathroom makeover projects as I try to get that bathroom to where I want it.


Here is Sweet Girl showing off our lovely new decoration. She is training to be one of the models on The Price is Right (please tell me I'm not the only person who watches that show.)

Linking Up At:


Photobucket
Photobucket
Reasons To Skip The Housework
Gettin Krafty With It


Okay, this may be my longest post yet, but it will all be worth it in the end. Before we left on our big trip to the other side of the country, I was frantically searching for toys to entertain Sweet Girl on the plane. I was terrified of her screaming and then we would all get kicked off the plane. I found a mini Magnadoodle (worth every penny of the $3 I paid for it), a notebook to draw in, a few books, her foam play makeup. I just needed on more thing, and I Spy Bag. I have always wanted to make one, so I searched for a good tutorial. Sew Easy Lemon Squeezy had the best I Spay Bag tutorial. I loved it! I made just a few alterations.

Here is my disclaimer. I am not an amazing sewer. I have never written a sewing tutorial before. I tried to write out what I did in a very clear way, and hopefully the pictures help. If I forgot something or it doesn't make sense, please be kind in asking for clarification. Don't make me cry. Thanks. Here goes.

What you need:
1/2 Yard of fabric- Probably even less, but better safe than sorry if you make a mistake and need another piece.
1 Piece of Plastic- I used a page protector.
Thread
Rice
20ish Small Objects- I found some of mine at Target in the dollar section and some in the button section at Joanns. These were the most expensive part, so watch for sales or coupons.

Step 1: Measure and cut out your pieces. 
The two 10x8 rectangles are the front and back. The 10x6 rectangle is the pocket on the back. The 20x 4 rectangle is the purse strap. I had to make this into a purse because Sweet Girl loves purses, plus it would make it easier for her to carry around.


 Step 2: Cut out the window and clip the corners.
Measure to find the middle point of one of your 10x8 rectangles. You will be making a 6x4 rectangle to cut out to make the window. From the middle point measure up 2 inches and down 2 inches, then 3 inches out to each side. Go ahead and draw right on your fabric because once it is cut and sewn you won't ever see it. Cut out the rectangle you just drew.


In each corner of the window you just made, measure 1 inch diagonally, and clip. Fold those new flaps backward and iron them down.


Step 3: Prep the back pocket.
While the iron is out, take the piece for the back pocket and fold it our twice, each time about 1/4 of an inch, and press it into place. Set this aside for a minute.

Step 4: Sew the plastic into the window.
You can use whatever plastic you have around the house. I just used a whole page protector because it's what I had. Pin on the full page to the back side of your window, you'll cut it down to the right size after it is sewn.   Sew twice around the window to make it extra sturdy. Cut off the extra plastic.


Step 5: Sew the pocket onto the back piece.
  Sew down the fold that you ironed down in step 3. Sew the pocket onto the back piece along the sides and the bottom, leaving the top open. I added a pocket for a marker by sewing a straight line down from the top of the pocket all the way to the bottom.


Step 6: Sew the Handle.
This step is totally optional. You can have a perfectly lovely bag with no handle if you prefer. To make the handle, just fold the piece in half with right sides together, and sew all the way down the side, leaving the ends open. Then turn the piece inside out (I always hate this step on any project. It's a pain.) Press the handle with an iron to give it a nice finished look.


Step 7: Sew this whole thing together.
Pin the front and back pieces together with the right sides facing in. Pin the ends of the handle into
the top where you want them to go. Than handle itself will be on the inside of everything.  Sew Around the top, 1 side, the bottom and half of the other side. Pull it right side out through the opening you left on one side.


Step 8: Fill it up!
Before I put my objects in I took a picture of them to print off and laminate. This is the check off sheet for what Sweet Girl needs to look for. I like this better than the list because it will probably be a few years before she can read, and this way she knows what to look for and can play independently (eventually I mean. She still isn't quite sure what to do with this besides carry it around and shake it.) 

I put in about 20 objects and then just added the rice until I thought it looked like enough. For an older child I would have added more, but I didn't want it to be too heavy for Sweet Girl to carry around.

Step 9: Sew it up and play!
Sew up the open edge. I added a flower with hot glue to make it extra girly. Time to Play!
 

Linking Up At:
Lil\'Luna


Photobucket


Sweet Girl is the biggest girly girl, and I love it. She loves her babies, purses, necklaces, and makeup. She loves to watch me put my makeup on and is always whining for me to giver her some to put on too. I have seen lots of ideas for play makeup, but this play makeup tutorial from Playing House in Maryland is the BEST that I have seen.  As you can see in the pictures, it looks very real.

Here is what you need:
  • Empty makeup containers- I had just finished a compact of powder, which was very convenient. I got the eyeshadow and blush from the dollar store.
  • Colored sheets of foam- I got mine from Joanns for under $1 a sheet.
  • Hot glue

I started by scraping out the makeup from the cases. Since I only spent $1, I didn't feel too bad about just scraping it out and throwing it away.

Then I cut out the pieces of foam to fill in the holes. To get accurate measurements I pressed the foam down into the empty cases and it left an indentation of how big each space was. Then it's super easy to cut out each piece and glue in.


I also bought a little pack of brushes from the dollar store and sewed a little bag for her to keep it all in. I also threw in a necklace and ring to top off her fancy look. She has played with it so much. She is always carrying her little purse around. It has been so much fun. One of the funniest things is seeing people's reaction to her makeup. Because it looks so real there is always a moment of shock and concern for their nice clean carpet.

Linking Up At:


Keeping It Simple


The Taylor House


I'm so excited to have time to post again. We've been so busy spending time with our family and friends, that I just have not found the time to get here. This evening I finally have a few minutes to write about these cute calendars I made.

I was inspired to make these when I saw similar ones that my friend, Nicolette, made. I like having a calendar to keep me organized, I can be very forgetful. But I also like to use it as a sort of record for everything that I have done that month. Several years ago while I was serving an LDS mission, I worked with another missionary who kept a calendar where she wrote about something she had done each day. So, I use this calendar to keep track of all the things we need to do as well as the fun things that we do. Then at the end of each month I can save the calendar pages in our scrapbook to look back and see all the things we have done throughout the year.


 There are two parts, the background and then the calendar itself.

To make the background I just used a piece of heavy duty cardstock and decorated it with other scraps, pictures and the name of the month. I used the edge of my black stamp pad to antique the edges. Then I laminated it for durability and so that I could reuse it every year.


For the calendar I just made up a template on my computer and printed it out on cardstock. I trimmed off the edges and antiqued the calendars. Finally I taped the calendar onto the background.

A super simple project that I have been able to enjoy for almost two years now.

Linking Up At:


I remember playing with my mom's flannel board all the time when I was little. When I saw that Oopsey Daisy had printable flannel board stories, I knew I needed to make my own. This was a super easy process.

Here's what you need:
1 1/2 Yards of flannel- Use a solid color so it doesn't distract from the story.
A board- I used a big foam posterboard from Walmart. It cost $1.
A glue gun and a lot of glue
Ribbon to trim the edges

I started off by ironing my flannel to get our any wrinkles or creases from where it had been folded. I wanted it to lay very smoothly.

Next I just started gluing. Let me just say, I need a new glue gun. I have a junky little one and by the time I was finished I had lost feeling in my trigger finger. On the front I glued the bottom edge of the fabric right to the bottom edge of the board. With the sides there was extra fabric, so I wrapped it around to the back, stretched it tight, and glued it down.

I cut enough fabric so that on top I could stretch the fabric over and completely cover the back side, so I have a double sided flannel board. This way when I'm telling a story on it I can have the pieces I need on back ready to use. I folded over the edges of the fabric on the back side to hide the ugly raw edge. Then I edged the entire board in a wide ribbon. I folded it almost in half. I glued the wider side to the front and the skinnier side to the back. I think it gives it a nice finished look.


Sweet Girl and I have already had fun playing with our new flannel board.

Linking Up At:


Lil\'Luna
Creations by Kara


I have been seeing these spong balls everywhere and thought they looked like so much fun, especially since Sweet Girl loves to play with anything wet. They were really easy to make. I bought a couple 3-packs of sponges at the dollar store and cut each of them into 4 strips. Then I wrapped a rubber band around the middle and squished them around until they looked like a ball. Finished!


Sweet Girl had fun playing with them in the baby pool and in the sprinklers. Don't you just lover her little swimsuit?


I am so excited about the way this project turned out. A few months ago I saw a picture on Pinterest of a star made out of a cereal box. It took me awhile to decide what I wanted to make with these stars, but I finally settled on a patriotic wreath.

Here's what you'll need:
Empty cereal boxes. (It used 3 boxes)
Paint
Ink for Distressing
Wreath
Hot Glue Gun

Luckily Husband goes through a lot of cereal, so I had plenty of empty cereal boxes for this project. I started by cutting out a star pattern with my Cricut, and then I traced that on the inside of the cereal box.

I cut out the stars and drew on the lines. Each line goes from the tip of the point, through the middle to the corner across from it. In the end I used about 15 stars.


I folded the star in half on each line and made sure to give it a hard crease.


After each line had been crease I kind of smushed it together so that it would take on a 3D look.


I spray painted the stars. I found that the white paint didn't stick very well. It kept soaking in. I was using cheap paint so that may have had something to do with it. In the end I finally just used a sponge brush to paint acrylic paint on the white ones. The red and blue stars turned out better. I did have to do a few coats. Again, I was using $1.50 cans of Walmart spray paint. If you have nicer spray paint it might go on a little better, but in the end I was happy with my cheap paint.

I also antiqued the edges by running them along a pad of black ink.


 Then I used hot glue to attach each star to my Dollar Store wreath.


I didn't really have a plan for how I overlapped them. I just started gluing. And finally after picking off all the leftover hot glue strings, I have my beautiful patriotic wreath!


 The only downside to this wreath is that if it gets rainy I'm afraid my stars will be ruined. I might have to look for a place inside to hang it.