Showing posts with label Home Decor. Show all posts


I love to read. Snuggling up with a good book is one of my favorite things to do. But even more than I love reading, I love books. I don't think a person can ever have too many books. I love the way they look and the way they smell. Over the years I have amassed a pretty good book collection (It would be bigger if Husband wasn't here to reign me in.) In our play room we have a large book shelf with many of my favorite children's books. While I love just the look of lots of books on a shelf, it felt like something was missing, so I added this cute decoration to the top. I picked up these paper mache letters at Joann's, and covered them in this cute paper I got from Hobby Lobby.


If you've never done this before it's a pretty simple process. Some people like to cut the paper to the exact size and shape of the letter, and then glue it on, but that is way too meticulous for me. I trace around the letter, leaving some extra space all around. Then I cut it out and mod podge it to the letter. You can see in the first picture how the paper is still hanging over the edge of the letter. Next fold the extra paper over the edge and use sandpaper to sand it off. It will rip off right next to the edge of the letter. IT does leave kind of an ugly ripped edge, so I take a black stamp pad and run it over the edges to cover it up, plus I add some to the front for and antiqued look. And voila, it's done!


I used my repurposed soda bottles to add some height and fullness. Now I not only love looking at all my books, but I also love the overall look of my shelf.

Years ago I found a shelf that I really loved at Target. Husband and I bought it and we have hung it up in every apartment/house we have lived in since then. And in every single house it has hung completely empty. It is kind of an odd shape. It is a rectangular box with smaller shelves built into it. Everything we tried to put inside was either too big or too small. It just never looked right. But for some reason we still always hung the shelf. Finally I decided it was time to either fill the shelf or get rid of it. I decided a basket might look cute in it, but as I started looking I realized it was going to be a pain trying to find something that would fit perfectly in those weird little cut outs, so I decided to make my own basket.


1. I started with a cereal box. (Maple and brown sugar Life is delicious by the way!) I measured out how big I wanted my shelf to be and cut the box down to size, then taped it into the right shape.

2. Next I cut a piece of muslin and hot glued it over the top. I didn't worry about how it doesn't matter hoe it looks on the inside and outside. The outside will be covered and the inside will be filled with stuff so nobody will ever see it.

3. Finally I just started wrapping and gluing. I used a roll of jute that I bought at Joann's for about $2. It took awhile to glue, so I made sure I had something to watch on TV. It was a great way to spend nap time. I wrapped all around the sides, but didn't bother with the bottom.

I loved the way it turned out. It was my first attempt so I learned a lot. First Push the jute really close together with each wrap or you will be able to see the cereal box peaking out. Second watch out for hot glue clumps. Third try to keep the wrapping straight or you will run into problems at the bottom.


The funny thing is that in the end this didn't fit the shelf where I wanted it. But when you spend maybe $.25 making something, it's not that sad if it doesn't work out. I did find a home for it in our guest bathroom and whipped up a new basket that fit better on my shelf. So simple! So cute! So cheap!


Even though the weather is still very summer like, I have been dying to put up my fall decorations. I love seeing all the fall crafts and activities on other blogs and Pinterest. So I decided it was time to make my fall wreath. I have been looking for inspiration for several weeks, and it finally struck when I saw this simple burlap wreath at Create Craft Love.

Here is what you need:
A wreath- I got this straw wreath at Walmart for $2.50.
Burlap cut into strips
Fall Leaves and Flowers
Twine
Paint
Ribbon
Hot Glue


1. I started with this straw wreath. It was very messy once I took the plastic off, so be prepared for that. I wrapped it in the burlap and hot glued the ends down.


2. I arranged and glued on the fall leaves and fall colored flowers.


3. Next came the bunting. I cut out the triangles and the letters on my cricut. I cut out burlap triangles and then used the letters as stencils.


4. I was planning on stopping here, but as Husband and I looked at it we agreed that it just felt like it was missing something. So I added this ribbon around it, and glued it under the leaves.


I love the way it turned out! I love how the burlap makes it feel very rustic, and I love the fall colors. The only problem is that it is too fat to fit in my wreath holder.


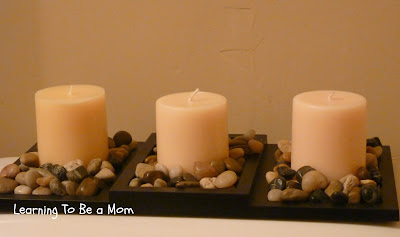
I have been very unhappy with our guest bathroom since we moved in. I just couldn't seem to find anything I liked to put in there. When we went to visit my sister-in-law inspiration struck. She had a cute toilet topper decoration with candles and  decorative rocks, so we replicated it for our bathroom.

Here is what I used.
Picture frame from Walmart-$3
Decorative rocks from the dollar store. I bought two bags, but only ended up using one.
Three candles from the dollar store.
Grand Total=$7


This was really easy to put together. I just set the candles in the middle of each of the rectangles of the frame and then poured the rocks in around the candles to fill in the frame.

I really liked the way this turned out. It was so simple, and it goes with the paintings I got from TJ Maxx. Hopefully I can show off a few more bathroom makeover projects as I try to get that bathroom to where I want it.


Here is Sweet Girl showing off our lovely new decoration. She is training to be one of the models on The Price is Right (please tell me I'm not the only person who watches that show.)

Linking Up At:


Photobucket
Photobucket
Reasons To Skip The Housework
Gettin Krafty With It